Add an Editor to a Detail View 将编辑器添加到详细信息视图
时间:2022-05-09 09:48
In this lesson, you will learn how to add an editor to a Detail View. For this purpose, the Department.Office property will be added to the Contact Detail View. You will also learn how to change the layout of a Detail View‘s editors.
在本课中,您将学习如何将编辑器添加到详细信息视图。为此,部门.Office 属性将添加到"联系人详细信息视图"。",因此,该部门将添加到"联系人详细信息视图"中。您还将学习如何更改详细信息视图编辑器的布局。
Note 注意
Before proceeding, take a moment to review the Place an Action in a Different Location lesson.
在继续之前,请花点时间复习"将操作置于不同位置"课程。
-
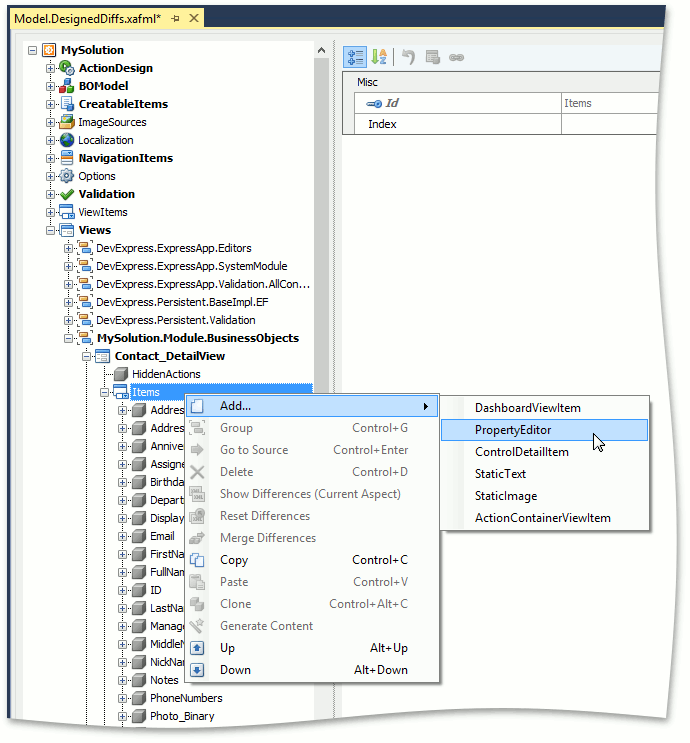
Invoke the Model Editor for the MySolution.Module project. Navigate to the Views | MySolution.Module.BusinessObjects node. Expand the Contact_DetailView child node. It contains the Items and Layout child nodes. To add an editor to a Contact Detail View, right-click the Items node and select Add | Property Editor.
-
调用 MySolution.模块项目的模型编辑器。导航到视图 |MySolution.模块.业务对象节点。展开Contact_DetailView子节点。它包含"项"和"布局"子节点。要将编辑器添加到联系人详细信息视图,请右键单击"项目"节点并选择"添加 |属性编辑器。
-
For the new node, set the PropertyName and Id properties to "Department.Office".
-
对于新节点,将属性名和 ID 属性设置为"部门.Office"。。

-
To display the new editor in a Contact Detail View, find the Layout node located under the Contact_DetailView node, expand its Layout | Main | SimpleEditors | Contact child node, right-click Contact_col2 and select Add | LayoutViewItem. For the new node, set the ViewItem and ID properties to "Department.Office".
-
要在"联系人详细信息"视图中显示新编辑器,请查找位于Contact_DetailView节点下的布局节点,展开其布局 |主菜 |简单编辑器 |联系子节点,右键单击Contact_col2并选择"添加 |布局视图项。对于新节点,将 ViewItem 和 ID 属性设置为"部门.Office"。。
Generally, you can place the editor in any layout group within the Layout node.
- 通常,您可以将编辑器放在布局节点中的任何布局组中。
-
You can see how the new editor will be displayed in a Contact Detail View by selecting the Layout node. The property list to the right will be replaced with a design surface that imitates the Contact Detail View. You can drag the new editor to the required location if the current one does not satisfy your needs. For this purpose, right-click an empty space and choose Customize Layout. The Customization Form will be invoked. Now, you can drag items to the required locations. When finished, close the form. For details, refer to the Customize the View Items Layout topic.
-
通过选择"布局"节点,您可以查看新编辑器在"联系人详细信息"视图中的显示方式。右侧的属性列表将替换为模仿"联系人详细信息视图"的设计图面。如果当前编辑器不能满足您的需要,则可以将新编辑器拖动到所需位置。为此,右键单击空白区域并选择"自定义布局"。将调用自定义窗体。现在,您可以将项目拖动到所需的位置。完成后,关闭窗体。有关详细信息,请参阅自定义视图项目布局主题。
To learn more about the Customization Form, the Layout Tree View tab and its context menu, refer to the Default Runtime Customization topic.
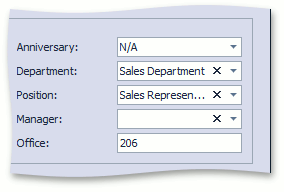
Run the WinForms or ASP.NET application and invoke a Contact Detail View. Notice the Office editor is located together with the Department editor, Position editor, etc.
要了解有关自定义窗体、布局树视图选项卡及其上下文菜单的详细信息,请参阅默认运行时自定义主题。
运行 WinForms 或ASP.NET应用程序并调用联系人详细信息视图。请注意,Office 编辑器与部门编辑器、职位编辑器等一起位于一起。
You can see the changes made in this lesson in the Model Editor invoked for the Model.DesignedDiffs.xafml file located in the Main Demo | MainDemo.Module project. The MainDemo application is installed in %PUBLIC%\Documents\DevExpress Demos 19.2\Components\eXpressApp Framework\MainDemo by default. The ASP.NET version is available online at http://demos.devexpress.com/XAF/MainDemo/
您可以在本课中为模型调用的模型编辑器中所做的更改。主演示模块项目。主演示应用程序安装在%PUBLIC%\Documents\DevExpress Demos 19.2\Components\eXpressApp Framework\MainDemo by default. The ASP.NET version is available online at http://demos.devexpress.com/XAF/MainDemo/
.
Note
Alternatively, you can customize the Contact Detail View layout at runtime, and then merge these customizations into the MySolution.Module project. Refer to the How to: Merge End-User Customizations into the XAF Solution topic for details.


本类排行
今日推荐
-
逗拍56个民族服装特效模板免费版

版本:11.6.0
大小:105.33MB
日期:2024-04-27
-
甜美证件照正式版

版本:1.1.2
大小:60.41MB
日期:2024-04-27
-
复古老照片滤镜免费版

版本:1.0
大小:65.46MB
日期:2024-04-27
-
柠萌相机官方版

版本:1.0.0
大小:22.60MB
日期:2024-04-27
-
玩美修图照相机新版

版本:8081.18.12.12
大小:28.26MB
日期:2024-04-27
-
智邦国际ERP系统官方版

版本:v3206.001
大小:28.96MB
日期:2024-04-27
热门手游
-
硬卡车司机模拟器完整版

版本:v3.3.0
大小:169.5M
日期:2024-04-27
-
RiderSkills骑手技能正式版

版本:v1.3.0
大小:85.1M
日期:2024-04-27
-
QQ飞车新版

版本:v4.7.1.3029701
大小:33.6M
日期:2024-04-27
-
Wheelie Life2官方版

版本:v1.5
大小:104.7M
日期:2024-04-27
-
疯狂赛车竞技新版

版本:v1.0.1
大小:96.7M
日期:2024-04-27
-
仙域奇侠传正版

版本:1.0
大小:2.26MB
日期:2024-04-27