推送消息
时间:2022-04-27 17:25
APNS(Apple Push Notification Services)苹果专门的推送服务器 接收我们自己应用服务器需要被推送的消息 然后推送到我们的手机 手机通知我们的应用程序
注册的大概流程:
1 设备需要向APNS服务器注册
2 注册成功后返回device_token值
3 将这个token值发送给我们自己的服务器
4 有需要推送的消息时 自己的服务器将消息按一定的格式打包 结合token值发送给APNS服务器
5 由于App与APNS维持一个基于TCP的长连接 APNS将消息推送到我们的手机上
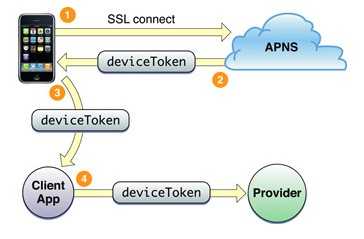
推送大致流程

1 你的APP支持推送 APP连接网络后会连接APNS 连接过程中 APNS会验证devices_token 连接成功后维持一个长连接
2 我们的服务器接收到需要推送的消息后将消息和设备的device_token一起打包发送给APNS服务器
3 APNS服务器接收到消息发送到指定device_token设备
4 设备接收到消息 通知我们的App
打包的消息结构
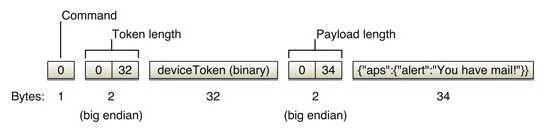
观看大神写的详情:http://www.cnblogs.com/taintain1984/p/3723324.html
1 本地推送
应用本地提醒用户事件
// 注册本地推送消息
+ (void)registerLocalNotification:(NSInteger)alertTime {
UILocalNotification *notification = [[UILocalNotification alloc] init];
// 设置触发通知的时间
NSDate *fireDate = [NSDate dateWithTimeIntervalSinceNow:alertTime];
NSLog(@"fireDate=%@",fireDate);
notification.fireDate = fireDate;
// 时区
notification.timeZone = [NSTimeZone defaultTimeZone];
// 设置重复的间隔
notification.repeatInterval = kCFCalendarUnitSecond;
// 通知内容
notification.alertBody = @"该起床了...";
notification.applicationIconBadgeNumber = 1;
// 通知被触发时播放的声音
notification.soundName = UILocalNotificationDefaultSoundName;
// 通知参数
NSDictionary *userDict = [NSDictionary dictionaryWithObject:@"开始学习iOS开发了" forKey:@"key"];
notification.userInfo = userDict;
// ios8后,需要添加这个注册,才能得到授权
if ([[UIApplication sharedApplication] respondsToSelector:@selector(registerUserNotificationSettings:)]) {
UIUserNotificationType type = UIUserNotificationTypeAlert | UIUserNotificationTypeBadge | UIUserNotificationTypeSound;
UIUserNotificationSettings *settings = [UIUserNotificationSettings settingsForTypes:type categories:nil];
[[UIApplication sharedApplication] registerUserNotificationSettings:settings];
// 通知重复提示的单位,可以是天、周、月
notification.repeatInterval = NSCalendarUnitDay;
} else {
// 通知重复提示的单位,可以是天、周、月
notification.repeatInterval = NSCalendarUnitMonth;
}
// 执行通知注册
[[UIApplication sharedApplication] scheduleLocalNotification:notification];
}
// 接收到推送消息执行的方法
- (void)application:(UIApplication *)application didReceiveLocalNotification:(UILocalNotification *)notification {
NSLog(@"noti:%@",notification);
// 这里真实需要处理交互的地方
// 获取通知所带的数据
NSString *notMess = [notification.userInfo objectForKey:@"key"];
UIAlertView *alert = [[UIAlertView alloc] initWithTitle:@"本地通知(前台)"message:notMess delegate:nil cancelButtonTitle:@"OK"otherButtonTitles:nil];
[alert show];
// 更新显示的徽章个数
NSInteger badge = [UIApplication sharedApplication].applicationIconBadgeNumber;
badge--;
badge = badge >= 0 ? badge : 0;
[UIApplication sharedApplication].applicationIconBadgeNumber = badge;
}
// 在Appdelegate 中调用注册推送消息的方法
[AppDelegate registerLocalNotification:10];
想要取消推送 需要调用
// 取消某个本地推送通知
+ (void)cancelLocalNotificationWithKey:(NSString *)key {
// 获取所有本地通知数组
NSArray *localNotifications = [UIApplication sharedApplication].scheduledLocalNotifications;
for (UILocalNotification *notification in localNotifications) {
NSDictionary *userInfo = notification.userInfo;
if (userInfo) {
// 根据设置通知参数时指定的key来获取通知参数
NSString *info = userInfo[key];
// 如果找到需要取消的通知,则取消
if (info != nil) {
[[UIApplication sharedApplication] cancelLocalNotification:notification];
break;
}
}
}
}
大神博客介绍:http://blog.csdn.net/woaifen3344/article/details/44302635
2 服务器推送
根据APP ID创建推送证书 转化成p12 再转成pem给后台用 后台推送的时候要把这个证书和push.php放在一起 后台使用push.php放在一起 后台使用push.php推送的时候要读取这个证书
创建一个测试证书
Appdelegate注册推送服务 并且通过代理方法的回调来获取注册成功的token值或者注册失败的信息(注册需要设置联网才可以 token可以理解为用户手机的唯一标识和应用程序的App ID组合生成的一个唯一标识,用来标识是哪个手机上的App token不是一直不变的 比如测试和发布的程序返回的token是不一样的)
把token值给服务器 这样服务器就会接受每一个同意了使用推送服务的用户的token 可以保存为一张表 当后台服务器需要发送消息的时候就可以从这张表里面找token后去发送消息
if ([[[UIDevice currentDevice] systemVersion] floatValue] >=8.0) {
// 1 向用户发送请求 去注册推送服务
UIUserNotificationSettings *settings = [UIUserNotificationSettings settingsForTypes:UIUserNotificationTypeAlert | UIUserNotificationTypeBadge | UIUserNotificationTypeSound categories:nil]; //弹框 角标 声音
// 2 把推送设置配置给我们的应用程序
[[UIApplication sharedApplication] registerUserNotificationSettings:settings];//iOS8.0
// 3 注册推送服务
[[UIApplication sharedApplication] registerForRemoteNotifications];
}else{
// iOS8.0前的方法
[[UIApplication sharedApplication] registerForRemoteNotificationTypes:(UIRemoteNotificationTypeAlert | UIRemoteNotificationTypeBadge | UIRemoteNotificationTypeSound)];
}
// 当前应用程序正在运行时候 接收到推送消息会执行的这个方法
- (void)application:(UIApplication *)application didReceiveRemoteNotification:(NSDictionary *)userInfo
{
NSLog(@"%@",userInfo);
_commentLabel.text = [userInfo objectForKey:@"aps"][@"alert"];
}
- (void)application:(UIApplication *)application didFailToRegisterForRemoteNotificationsWithError:(NSError *)error
{
NSLog(@"注册远程推送服务失败:%@",error);
}
- (void)application:(UIApplication *)application didRegisterForRemoteNotificationsWithDeviceToken:(NSData *)deviceToken
{
NSLog(@"token :%@",deviceToken);
// 正常情况下 会在这个地方发送请求 把这个token返回给自己的服务器
}


本类排行
今日推荐


热门手游
-
地下道中文版

版本:v1.0.6
大小:89.16MB
日期:2024-04-23
-
逃脱游戏GHOST手机版

版本:v1.1
大小:58.37MB
日期:2024-04-23
-
索尼克狂欢Plus破解版

版本:v1.1.0
大小:259.83MB
日期:2024-04-23
-
我的地盘我说了算免广告版

版本:v113
大小:206.4MB
日期:2024-04-23
-
周五夜放克无广告版

版本:1.1.1
大小:93.41MB
日期:2024-04-23
-
刺激飞跃摩托新版

版本:v306.1.0.3018
大小:95.7M
日期:2024-04-23