详解Nginx1.19 php8.0 源码编译安装
时间:2022-02-23 17:41
推荐学习:《PHP8教程》 准备好centos7及以上的版本 第一步 下载nginx包放置在指定目录下一般放置mnt目录: 下载地址 : nginx.org/en/download.html 解压nginx压缩包 准备依赖包: 准备nginx用户: 源码编译与安装: 设置配置文件: 服务管理: 2.启动服务 3.重载服务 4.关闭服务 5.开机启动 进程管理: 端口管理: 客户端测试:(输入你的公网IP) nginx 重载 php8.0 源码编译安装 一 安装php8的依赖 二 安装php8的依赖包 1.解压 2.切换目录 3生成configure 4.生成编译配置文件 5.编译并安装 2.编译PHP8主包 2.切换目录 3.生成编译配置文件 4.编译并安装 error 编译安装遇到的错误 以上就是详解Nginx1.19 php8.0 源码编译安装的详细内容,更多请关注gxlsystem其它相关文章!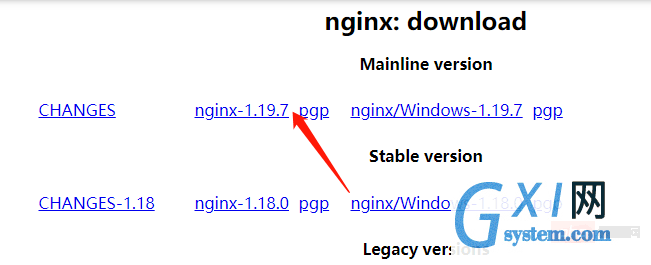
tar zxvf nginx-1.19.7.tar.gz
yum -y install zlib-devel pcre-devel openssl-devel
useradd -M -s /sbin/nologin nginx
./configure --prefix=/usr/local/nginx --with-http_stub_status_module --with-http_ssl_module --with-http_random_index_module --with-http_sub_module

make
make install
user nginx;
1.检测配置语法/usr/local/nginx/sbin/nginx -t
/usr/local/nginx/sbin/nginx
/usr/local/nginx/sbin/nginx -s reload
pkill -HUP nginx
/usr/local/nginx/sbin/nginx -s stop
pkill nginx
vi /etc/rc.local/usr/local/nginx/sbin/nginx
pstree |grep nginx
ps -ef |grep nginx
ps aux |grep nginx
netstat -tunpl |grep nginx
http://192.168.2.1
[root@wml sbin]# pkill -HUP nginx
yum -y install autoconf freetype gd libpng libpng-devel libjpeg libxml2 libxml2-devel zlib curl curl-devel net-snmp-devel libjpeg-devel php-ldap openldap-devel openldap-clients freetype-devel gmp-devel libzip libzip-devel sqlite-devel
tar -zxvf oniguruma-6.9.4.tar.gz
cd oniguruma-6.9.4/
./autogen.sh
./configure --prefix=/usr
make && make install
1.解压tar xzf php-8.0.0.tar.gz
cd php-8.0.0/
./configure --prefix=/usr/local/php --with-config-file-path=/usr/local/php/etc --enable-fpm --with-fpm-user=nginx --with-fpm-group=nginx --enable-mysqlnd --with-mysqli --with-pdo-mysql --enable-opcache --with-pcre-jit --enable-gd --with-jpeg --with-freetype --with-gettext --with-curl --with-openssl --enable-sockets --enable-mbstring --enable-xml --with-zip --with-zlib --with-snmp --with-mhash --enable-ftp --enable-bcmath --enable-soap --enable-shmop --enable-sysvsem --enable-pcntl --with-gmp
make && make install

解决办法 yum install automake

解决办法 执行 yum install libtool
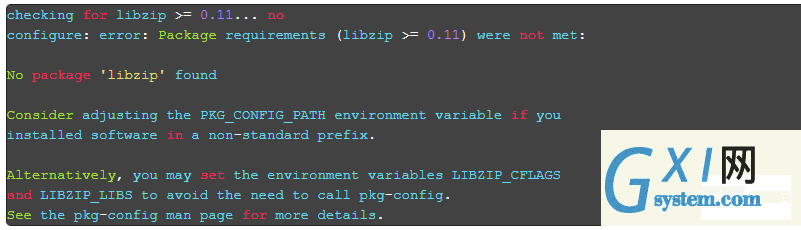
解决办法 参考 下图


本类排行
今日推荐
-
无限Wifi伴侣精简版

版本:v1.1.62
大小:31.4M
日期:2024-05-02
-
电池防爆大师经典版

版本:v1.0.2
大小:17.7M
日期:2024-05-02
-
韩语入门免费版

版本:v5.4.3
大小:27.03MB
日期:2024-05-02
-
极速管家清理免费版

版本:v1.0.0
大小:21.2M
日期:2024-05-02
-
手机垃圾清理加速器官方版

版本:v8.0
大小:18.9M
日期:2024-05-02
-
启音在线官方版

版本:v3.8.15
大小:47.26 MB
日期:2024-05-02
热门手游
-
勇夺世界杯破解版

版本:1.0.2
大小:41.08MB
日期:2024-05-02
-
有趣的棒球官方版

版本:1.132
大小:57.87MB
日期:2024-05-02
-
篮球世界模拟器手机版

版本:1.0
大小:221.18MB
日期:2024-05-02
-
点球达人2免费版

版本:0.5.3
大小:89.27MB
日期:2024-05-02
-
fifa online4手机版

版本:1.2302.0002
大小:533.58MB
日期:2024-05-02
-
晴明传官方版

版本:0.1.16
大小:1.2GB
日期:2024-05-02